STARK COUNTY BAR ASSOCIATION
Introduction to Orienteering – 2020/21
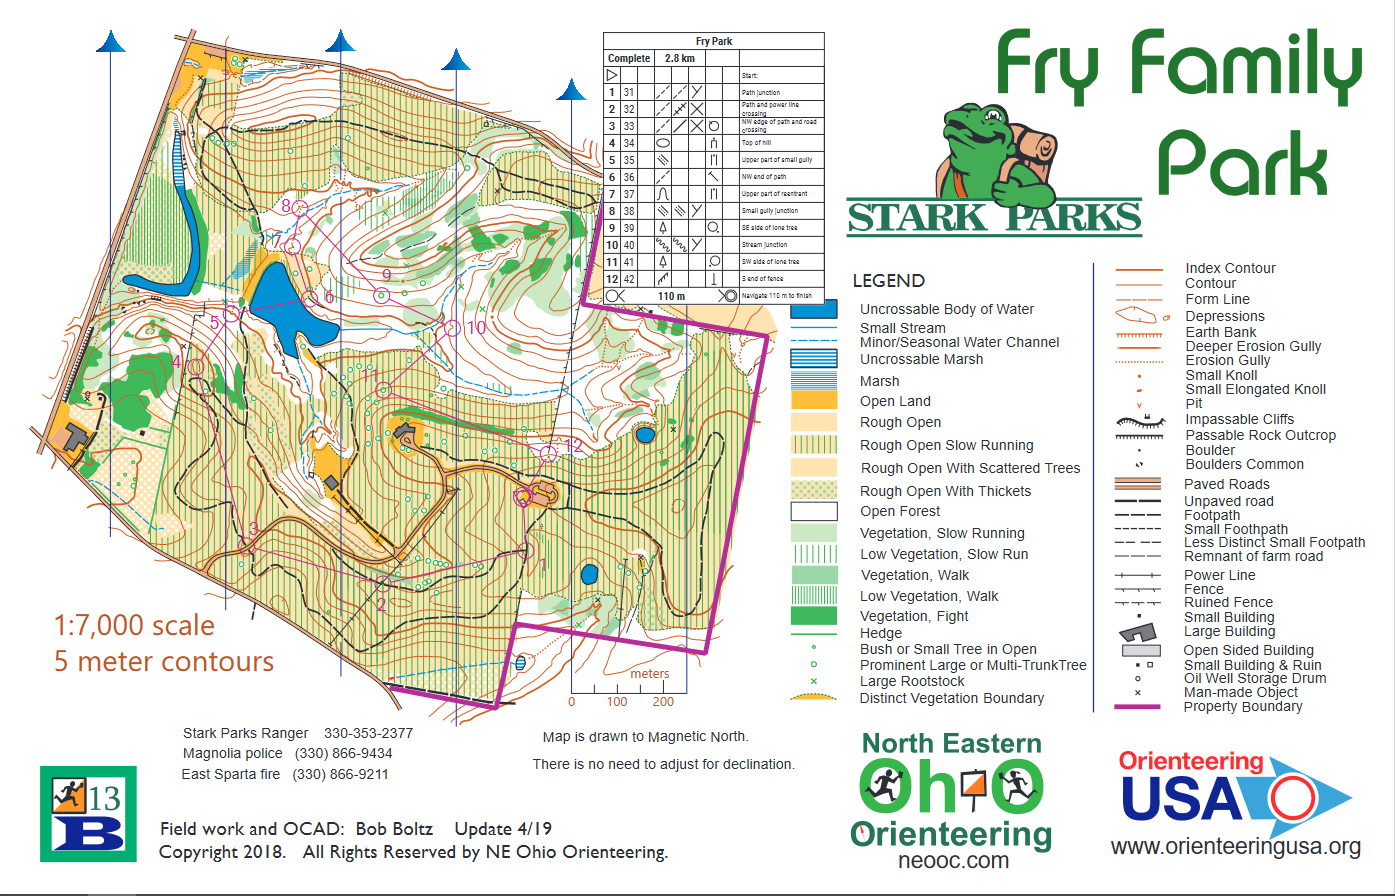
Here is a link to the map that you will be using for this tutorial:
Start to Finish – Complete PDF file
Also, see the resources and references at the bottom of this page for further learning.
Start to Control 1: Skill level of Control Location – White/Beginner
You start your journey from the circle/triangle symbol on the lawn just north of the shelter. Orienteering is about choices. To find your way to Control 1 you have two choices. The orange with green line symbol area on the way to Control 1 is an area of low growth that grows taller during the year. During winter or early spring you might just want to take a bearing and walk south to the trail junction. During the summer and fall you might take a slightly longer route. Travel to the SE corner of the parking lot and find the trailhead. You will have to make a decision here. Do you turn right or left to find your way to the control at the trail junction? Which of the two route choices is longer? Which would be more foolproof?
Control 1 to 2: Skill level of Control Location – White/Beginner
Control 2 is a spot where a power line crosses a trail. #1 is a spot where three trails meet. Here is a good time to make sure your map is oriented to north so that you are sure to travel west, not to the south or back to the north. Would a straight line of travel or the path be the logical choice. The green circles are individual trees. How many will you see on the left side of the trail on your journey? You will drop a total of two contour lines from #1 to #2. Each contour line is worth 5 meters or 16 feet. So, what would your total elevation loss be?
Control Flag 2 to Control Flag 3 – Skill level of Control Location – White/Beginner
Taking a straight line here would save more than the length of a football field, but is that the safest route? What will you see where the control flag is placed at #3?
Control Flag #3 to Control Flag #4 – Skill level of Control Location – Yellow/Advanced Beginner
This is your first instance of a control that is not on the trail. Also, there are two choices to consider. Traveling NW on the trail from #3 will certainly get you to the tight bend in the trail that will alert you to look for the flag at #4. Another possibility is to walk NE to the road bend, then NW on the trail to #4. Which do you think has greater merit? The oval contour line in the purple circle at #4 indicates the top of a hill. To double-check that you are indeed at the correct tight bend just south of #4, notice that there is a lone tree inside that bend.
Control Flag #4 to Control Flag #5 – Skill level of Control Location – Yellow/Advanced Beginner
Now it gets interesting! Most of the purple line connecting #4 and #5 goes through a white area. This indicates open forest with little or no low growth to slow you down or block your vision. This would be the shortest route and would require a compass bearing. You still have the option of going back to the bend in the trail south of #4, following the trail SE to the trail junction, then turning left onto the new trail and heading for #5. How would you know when make a left turn off the trail to find #5? (Hint: if you get to the lake, you went a little too far.) Another thing to consider are all those contour lines between #4 and #5. How many contour lines will you have to cross? Will you be going uphill or downhill? (Hint: as you go away from water, like a lake or stream, you are going uphill.) The feature at #5 will be the top of a small gully. Knowing all this, which route will you take?
Control Flag #5 to Control Flag #6 – Skill level of Control Location – Yellow/Advanced Beginner
Oh, no! The purple line crosses a lake. The lake is edged by a solid black line which tells an orienteer that it is forbidden to cross by swimming or wading. So, which way around the lake looks the best? What will you see where Flag #6 is located?
Control Flag #6 to Control Flag #7 – Skill level of Control Location – Yellow/Advanced Beginner
This is a short leg, but is instructive to get a glimpse of what would go through the mind of an elite orienteer. The route to #7 parallels the lake shore. Using the lake shore as a kind of handrail and aiming between the two lone trees, you can more quickly without a lot of thought. The control flag will be only a very short distance into the open woods and should be easy to spot. The orienteer might use this time to look ahead and plan their route to the next control.
Control Flag #7 to Control Flag #8 – Skill level of Control Location – Orange/Intermediate
This is a short control, but we don’t want to waste time. So, we must get to the stream quickly, cross it and turn to the right. #8 is at a location where two gullies meet and then flow to the main stream. We can’t miss because we will have to run into the place where the gully meets the main stream. Success! And no need for a compass bearing.
Control Flag #8 to Control Flag #9 – Skill level of Control Location – Orange/Intermediate
Although the purple line between #8 and #9 is almost all through open woods, there is something else to consider. After we cross the stream, how many contour lines will we climb before we start down again if we follow the purple line? Now, consider bending your line of travel so that it travels through the clearing between #6 and #7. Once you leave the east tip of the clearing, keep moving forward without going either up or down. This will bring you very near the tree at #9. How many contour lines of climb will this save you? Things don’t always go as planned, so here’s a tip. Let’s say that for some reason you pass #9 without noticing it. You will eventually run into the stream. We call this a catching feature or backstop.
Control Flag #9 to Control Flag #10 – Skill level of Control Location – Orange/Intermediate
Between #9 and #10 is an area of vegetation that you might want to avoid by going around either clockwise or counterclockwise. In either case, we will encounter the stream. There is a marshy area south of the stream and west of #10 that should be considered. Also, note that there is a short bit of trail west of #10 that was noticed by the mapper that could provide a good place to cross the stream. Once across, it is a short hike on a perfect east bearing to nail the control. We call such an easily located feature (the stream crossing) an attack point. The idea is to aim for something easy to find close to your ultimate destination.
Control Flag #10 to Control Flag #11 – Skill level of Control Location – Orange/Intermediate
The big question here is how to get across the marshy area. Just decide on right, left or straight, and stick to your plan. In any case, when you enter the field, you should see one of the small green circles for a lone tree or shrub. Use these as attack points to take a bearing to the lone tree at #11.
Control Flag #11 to Control Flag #12 – Skill level of Control Location – Orange/Intermediate
For this leg, face to the east toward where #12 is located and start moving in that direction across the field. Use the thick vegetation on your right (dark green on the map) as a “handrail” to move across the field. When you hit the fence, go south to find the control at the end of the fence.
Control Flag #12 to Finish – Skill level of Finish Location – Yellow/Adv. Beginner
Complete the course by going up the hill to the Parking Lot area and find the Finish next to the building.
Congratulations! You have finished the Course! Well done!
Start to Finish – Complete PDF file
Resources and References
FOR MORE OVERALL EDUCATION INFORMATION, go to https://neooc.com/about-orienteering/
FOR MORE DETAILS ON COURSE LEVELS, go to https://neooc.com/course-levels/
FOR MORE DETAILS ON FEATURES & CONTROL DESCRIPTION, go to https://neooc.com/control-descriptions/
FOR MORE DETAILS ON MAPS, go to https://neooc.com/maps/